Homemade CNC Coil Winder · Volume 2
The Build: Architecture and Design Choices
2.1 The Four Jobs, in Hardware
A CNC coil winder is the coordination of four jobs — spin, traverse, count, tension — and a shop-built machine is a set of concrete answers to how each is done. The general architecture that the maker community has converged on, and that this machine follows, is a two-axis motion system driven by stepper motors under microcontroller control, with a wire-management path bolted to the same frame. On this machine that frame is built from 80/20 Inc. 10-series T-slotted aluminum extrusion — the one-inch-profile modular “industrial erector set” rail. Its continuous T-slots let the spindle head, the traverse axis, the tensioner, and the fixturing be bolted anywhere along a rail and slid, re-squared, or re-spaced by loosening a single fastener, with no re-machining. For a one-off machine that will be revised as the shop learns what it needs, that reconfigurability is worth more than the rigidity of a welded or cast frame, and the extrusion is stiff and flat enough that a carefully aligned build holds its geometry under winding loads.
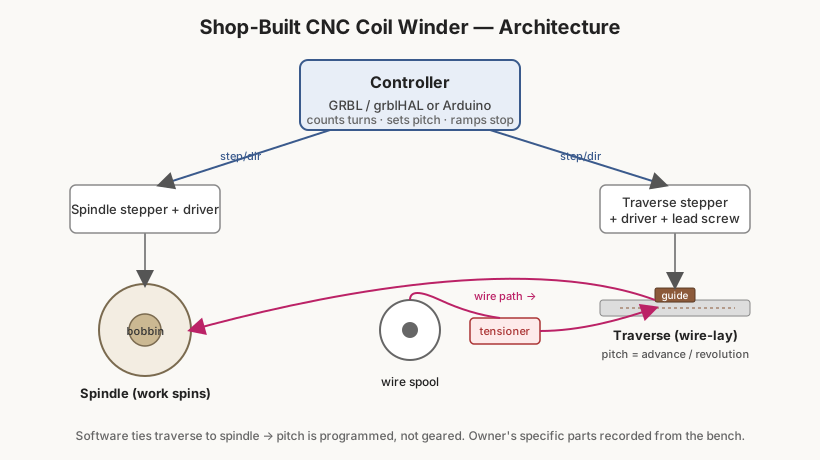
The spindle carries the work. A stepper motor (or a stepper geared down for torque) turns an arbor onto which the bobbin, former, or core is mounted; the arbor and its fixturing are usually the most build-specific part of the machine, because they have to match the actual parts this shop winds. Using a stepper rather than a plain DC motor for the spindle is what makes turn counting exact — every step is a known fraction of a revolution, so the controller always knows the angular position and the turn count without a separate sensor. Some builds add an index sensor anyway as a check.
The traverse lays the wire. A second stepper drives a lead screw (or a belt) that moves a wire guide back and forth along the axis of the winding. The controller ties the traverse motion to the spindle rotation at a programmed ratio, so that one spindle revolution advances the guide by one wire diameter for close winding, by more for a spaced winding, or by a programmed step at the end of each layer. This software-set pitch is the defining CNC feature; it is what a hand winder cannot do without change gears.
The counter lives in the controller. Because the spindle is a stepper, turns are counted in software by accumulating steps, and the machine decelerates and stops on a preset target. Presets for turn count, pitch, layer count, and start/stop ramp are the substance of a winding “program.”
The tensioner keeps the wire honest. The wire pays off its spool through a tensioning device — felt pads, a spring-loaded dancer arm, or a simple friction post — and through the guide on the traverse. Constant, correct tension is the difference between a tidy, repeatable coil and a loose or wire-stretching mess, and getting a home-built tensioner to run light enough for fine wire without snagging is one of the classic design challenges the builder solves.
2.2 Design Choices a Home Build Gets to Make
The value of building the machine is that every one of these becomes a deliberate choice rather than a vendor’s compromise:
- Capacity — the frame, arbor, and traverse length are sized to the coils this shop actually winds, whether that means larger bobbins than a desktop commercial unit accepts or the finesse for very fine wire.
- Controller and firmware — a GRBL/grblHAL board (coordinating spindle and traverse as two axes, driven from a sender or a small UI) or a dedicated Arduino sketch with a keypad and display. The choice sets how a winding program is entered and how flexible the patterns can be.
- Motion parts — stepper sizes, drivers (and their microstepping and current limits), lead-screw pitch or belt reduction, and the couplings — all drawn from the same home-CNC/3D-printing parts bin that supplies the rest of this shop.
- Fixturing — custom arbors, mandrels, and bobbin adapters, which a shop with a lathe and a mill and 3D printers can make to fit any job. This is often where the home machine most clearly beats a bought one.
- User interface — from a laptop running a GRBL sender, to a standalone keypad-and-LCD, to a touchscreen; whatever suits how the shop programs a wind.
The point running through all of these is repairability and reach: a machine the builder designed can be understood, fixed, and extended indefinitely, and it can be aimed at exactly the coils and transformers that the electronics work in this collection calls for.
2.3 This Machine’s Build
The specific realization — the 80/20 10-series T-slot extrusion frame, the spindle and traverse motors and their drivers, the controller and firmware, the tensioner design, the arbors and fixturing, and the user interface — is this shop’s own design, and the details and photographs are recorded from the bench as the build is documented. The winding technique used on it, and how to verify a finished coil, are covered in the Coils and coil winding reference dive (the winding-machines, technique, and measurement volumes); this machine is the shop-built tool that puts that craft to work, alongside the coming Transformers and transformer winding dive.
Comments (0)