HiTorque 3990 Mini Mill · Volume 5
HiTorque 3990 Mini Mill — Reference
5.1 How to use this volume
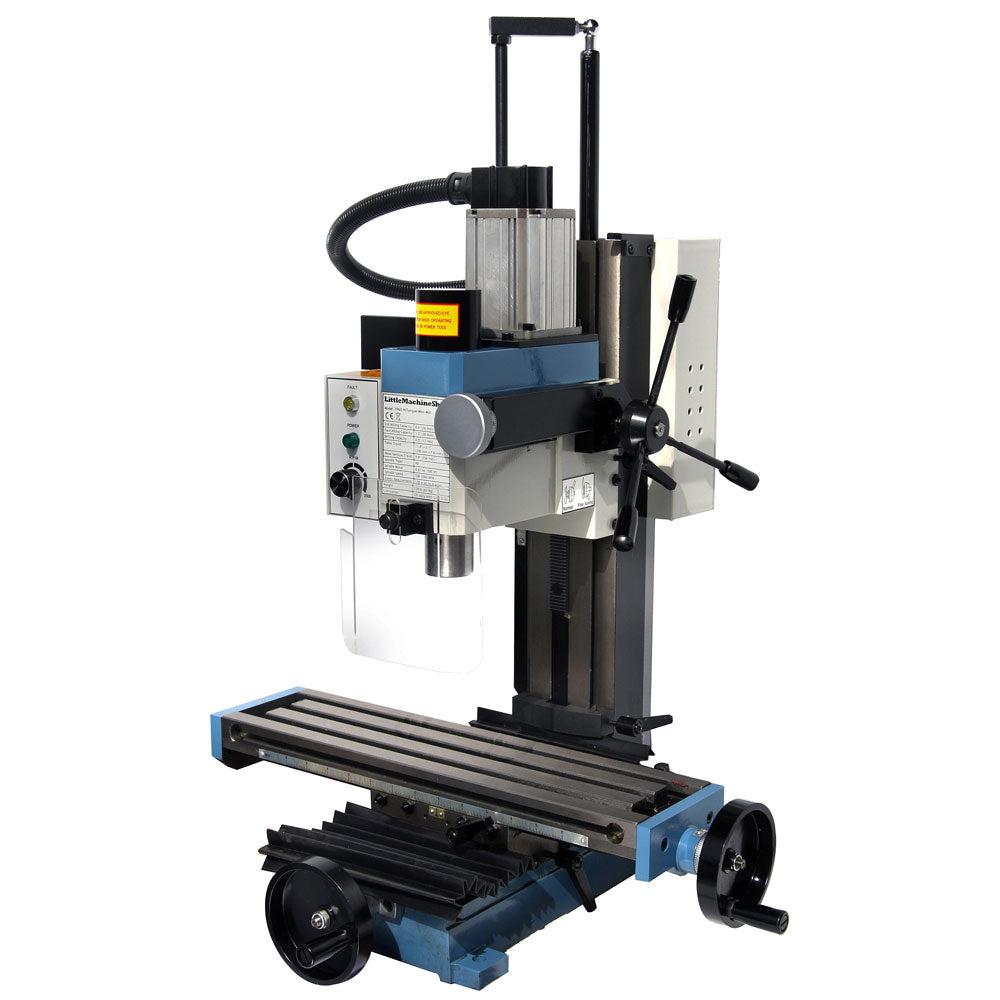
This is the reference shelf for the machine: the specifications in one table, the DRO system as a parts list, a maintenance routine, and where to go for more. The machine-specific numbers are drawn from the LittleMachineShop (LMS) product listing for the HiTorque 3990; the DRO figures describe the general TouchDRO system fitted to this machine, with this shop’s exact parts left as clearly marked slots until they are recorded from the hardware.
5.2 Specifications — HiTorque 3990 Mini Mill
The following table summarises the LMS 3990 as configured with an R8 spindle. Metric and imperial values are both given as LMS publishes them.
Table 1 — Specifications — HiTorque 3990 Mini Mill
| Parameter | Specification |
|---|---|
| Spindle taper | R8 |
| Drive motor | 500 W (0.67 hp) brushless DC |
| Spindle speed | 100–2500 rpm, continuously variable (no gears/belts to shift) |
| Speed control | Single front-panel dial; single toothed-belt drive |
| Table size | 460 mm × 120 mm (18.11 in × 4.72 in) |
| T-slots | 3 slots, 12 mm (0.472 in) wide |
| X-axis travel (table) | 300 mm (11.81 in) |
| Y-axis travel (saddle) | 130 mm (5.12 in) |
| Z-axis travel (head) | 270 mm (10.63 in) |
| End-milling capacity | 16 mm (0.63 in) |
| Face-milling capacity | 30 mm (1.18 in) |
| Drilling capacity | 13 mm (0.51 in) |
| Throat (spindle to column) | 165 mm (6.50 in) |
| Max spindle-nose to table | 292 mm (11.50 in) |
| Column | Solid, non-tilting dovetail casting |
| Head support | Air spring |
| Z fine-feed resolution | ~0.001 in per graduation |
| Stated positioning accuracy | 0.01 mm |
| Weight | ~124 lb (56 kg) |
| Overall dimensions | ~23.2 × 19.7 × 36.3 in (W×D×H) |
| Electrical | 120 V, 60 Hz, 8 A |
A few notes on reading the table. The capacities (16/30/13 mm) are the largest tools the machine will turn, not the depth of cut per pass — actual depth of cut is far smaller and depends on material (Volume 4). The stated positioning accuracy of 0.01 mm is a factory figure for the machine’s own mechanism; in practice the DRO retrofit is what delivers reliable, repeatable positioning at the bench because it reads true axis position independent of leadscrew backlash. The throat and max spindle-to-table numbers set the size envelope: the throat limits how far from the column a feature can be, and the spindle-to-table distance limits how tall a workpiece-plus-tool stack the machine can clear.
5.3 The DRO / TouchDRO system — parts overview
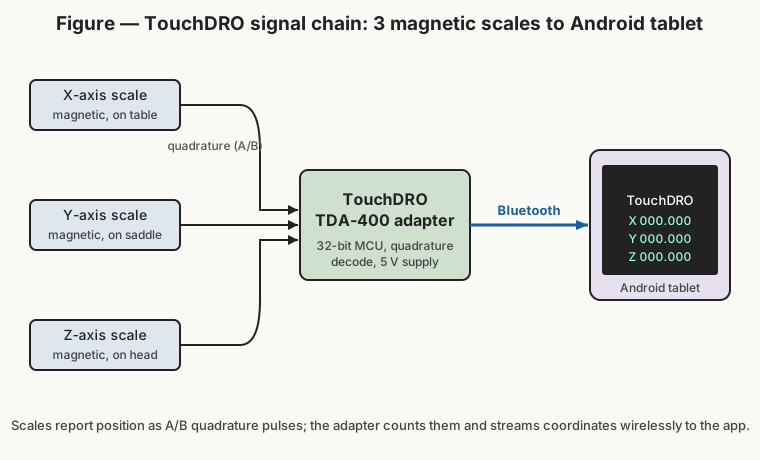
The digital readout is a retrofit, not a factory option, so it is documented here as its own small system. The architecture (developed in Volume 3) is three parts — scales, adapter, tablet — and the parts break down as follows.
Linear scales (×3). Magnetic linear scales, one per axis (X, Y, Z), each outputting 5 V A/B quadrature. Magnetic type is chosen for its tolerance of chips and coolant. Each axis needs a scale of a length matched to that axis’s travel (300 mm X, 130 mm Y, 270 mm Z, plus the mounting overhead), so the three scales are different lengths.
- Scale technology: magnetic (magnetoresistive read head over a magnetised, stainless-sealed tape)
- Output: A/B quadrature, 5 V (RS-422 differential or TTL)
- Typical resolution: 5 micron (some 1 micron)
- This shop’s exact brand and per-axis lengths:
Adapter. A TouchDRO TDA-400 scale-interface adapter: a 32-bit dual-core board reading up to four 5 V quadrature scales and streaming coordinates to the tablet over Bluetooth (with a USB link also available). Three of the four inputs are used; one is spare. Powered from a 5 V supply; configuration held in non-volatile memory.
Display. An Android tablet running the free TouchDRO app from the Google Play Store, paired to the adapter over Bluetooth and configured with each axis’s resolution and direction. Mounted on an arm beside the head.
- This shop’s exact tablet model and mount:
Consumables and hardware. Fabricated mounting brackets (per axis, especially the tight Y and Z), a 5 V power supply for the adapter, and cabling with proper strain relief. These are build-specific and recorded with the machine.
5.4 How the 3990 compares
For context, it helps to place the 3990 against the machines it is descended from and sold alongside. All of these trace back to the Sieg X2 pattern; the differences are in motor, column, and table.
Table 2 — How the 3990 compares
| Feature | Classic Sieg X2 | HiTorque 3990 |
|---|---|---|
| Spindle motor | Brushed DC | Brushless DC, 500 W |
| Drive | Two-range gear train | Single toothed belt |
| Speed change | Shift gears (low/high range) | Continuous dial, no shifting |
| Column | Round or tilting | Solid dovetail (non-tilting) |
| Table (typical) | Smaller | 460 × 120 mm (larger LMS table) |
| X travel (typical) | Shorter | 300 mm (about 30% more) |
| Spindle taper | MT3 or R8 | R8 |
| Head tilt | Some models tilt | Fixed (rigid) |
The pattern in the table is the whole HiTorque design philosophy: trade the round/tilting column’s ability to swivel for the solid column’s rigidity and repeatability, replace the noisy, strippable gear train with a quiet belt and a torquey brushless motor, and give the machine a bigger table with more travel. The one genuine capability the 3990 gives up is head tilt for angled work, which is recovered when needed with an angle vice, a tilting table, or an angle plate. For a shop that values a mill that stays square and does not fuss with gear shifts, the trade is strongly favourable.
A note on model numbers: LMS assigns the number 3990 to the machine itself; related SKUs (for example a tooling package that bundles the mill with collets, a vice, and cutters) carry their own numbers but are the same base machine. The specifications above are for the bare 3990.
5.5 Maintenance
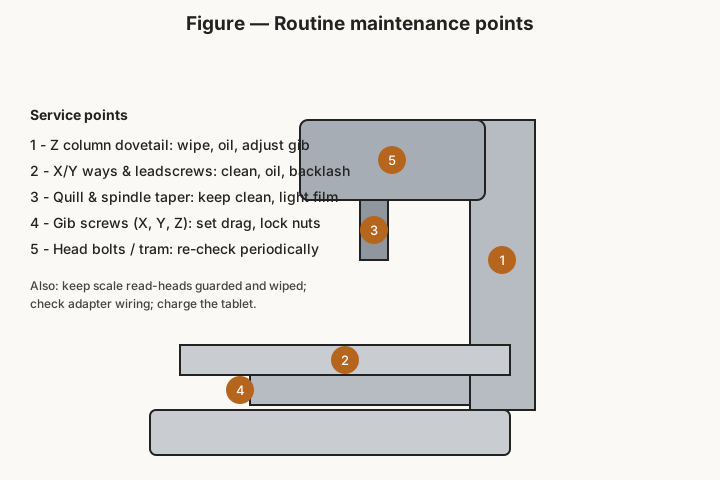
A mini mill rewards a little routine care and punishes neglect with lost accuracy and stiff, worn ways. The following is a sensible schedule; adjust to how hard the machine is used.
Every session (before/after use).
- Wipe chips off the table, ways, and especially the scale read-heads before they get dragged into a slide.
- Wipe a light film of way oil onto the exposed X/Y ways and the leadscrews.
- Retract the quill and leave the head clamped when finished.
Regularly (weekly, or per few hours of cutting).
- Clean and re-oil all three sets of dovetail ways (X, Y, Z) and the leadscrews.
- Check the quill and spindle taper are clean; a chip or burr in the R8 taper will throw every tool that follows it. Keep a light film against rust, but the taper itself must seat clean and dry.
- Check that the DRO scale guards are in place and the read-heads are clean; confirm the adapter cabling is intact and strain-relieved.
Periodically (monthly, or when accuracy drifts).
- Check and adjust the gibs on each axis: smooth motion with a slight even drag and no play (Volume 4).
- Measure backlash on X and Y; adjust or replace nuts if it has grown.
- Re-tram the head with a dial indicator swept in the spindle; correct any nod or side-to-side error at the head/column joint (Volume 2).
- Inspect the drive belt for wear; check that the head air spring still supports the head smoothly.
As needed.
- Recharge/replace the tablet; re-pair Bluetooth if the connection is lost.
- Replace dull or chipped cutters promptly — a dull cutter is the fastest way to overload a light machine.
5.6 Tooling and accessories reference
A mill is only as useful as the tooling around it. The following is the core kit that makes the 3990 productive, grouped by function; specifics are chosen to suit the R8 spindle and the machine’s modest power.
Spindle tooling (all R8).
- A set of R8 collets covering the common shank sizes (metric and/or fractional-inch to match the end-mill stock the shop buys). Collets are the primary end-mill holders.
- A drill chuck on an R8 arbor — typically a keyed or keyless chuck to about 13 mm — for twist drills and centre drills.
- One or more R8 end-mill holders for Weldon-flat-shank cutters that a collet should not grip.
- An R8 boring head with boring bars for producing accurate hole diameters.
- A spare drawbar and the correct spanner; drawbars do get damaged.
Cutters.
- A stock of HSS and/or carbide end mills in the sizes the shop uses most, in two- and four-flute forms. HSS is forgiving and re-sharpenable; carbide holds an edge and runs faster but is brittle on a light machine.
- Centre drills / spotting drills for starting holes true.
- A fly cutter and/or a small face mill for surfacing.
- Twist drills spanning the drilling range, plus reamers where a precise hole is needed without boring.
Workholding.
- A precision milling vice sized for the table — the everyday holder.
- A clamping set: T-nuts to fit the 12 mm slots, step clamps, and studs.
- Parallels for setting work at a known height in the vice.
- Optionally an angle plate, a tilting table, or a rotary table for angled and circular work — these are how the fixed-column 3990 recovers the geometry a tilting head would give.
Measuring and setup.
- An edge finder and/or a wiggler for picking up datums to zero on the DRO.
- A dial test indicator and holder for tramming and for indicating the vice.
- Calipers, a micrometer set, and a good rule.
For the machine itself.
- Way oil and an oiler.
- Spare gib screws, and knowledge of the belt part number.
Most of this can be bought piecemeal or as a tooling package; LMS and others sell 3990 bundles that cover the collets, chuck, vice, and a starter set of cutters in one purchase.
5.7 Quick troubleshooting
A short field guide to the machine’s common complaints.
- Chatter or poor finish. Almost always too much depth of cut, too high a feed, a dull cutter, loose gibs, an extended quill, or an insecure workpiece. Reduce the cut, tighten the gibs, retract the quill, re-clamp.
- Cutter grabs / table snatches. Climb milling with too much backlash and a light cut that let the cutter pull the table. Switch to conventional milling for roughing, tighten gibs, reduce backlash.
- Holes or faces come out out-of-square. Head out of tram, or the vice not aligned to the table travel. Re-tram; indicate the vice fixed jaw parallel to X.
- DRO reads erratically or an axis freezes. Almost always a scale problem: a chip in the read-head, a fouled or bowed scale, or a chafed/pinched cable. Clean and inspect the scale, check the cable and its strain relief, confirm the adapter has power and is paired.
- Spindle bogs or stalls under cut. Beyond the machine’s capacity for that cut — reduce depth/feed, drop rpm to suit the material, confirm the belt is not slipping.
5.8 Links and further reading
The following are the primary and community references for this machine and its DRO. (URLs current as of writing; verify against the live sites.)
The machine (LittleMachineShop).
- HiTorque 3990 Mini Mill product page and specifications — littlemachineshop.com (search “HiTorque 3990 Mini Mill”).
- HiTorque 3990 User’s Guide (solid column with air spring) — LMS documents section; also mirrored on ManualsLib.
- “What’s the Difference?” — LMS’s own comparison of the HiTorque line against the standard Sieg X2 (littlemachineshop.com/info/hitorque_better.php), covering the brushless motor, belt drive, and solid column.
The DRO (TouchDRO / Yuriy’s Toys).
- TouchDRO — touchdro.com: the project home, adapter store, and resources, including the current TDA-4xx adapter manuals.
- Yuriy’s Toys — yuriystoys.com: the original DIY DRO project pages, build details, and background from developer Yuriy Krushelnytskiy.
- TouchDRO Android app — free on the Google Play Store (search “TouchDRO”).
Community and background.
- The Hobby-Machinist forum (hobby-machinist.com) — active mini-mill and TouchDRO threads, including HiTorque and TDA-400/420 discussions.
- mini-lathe.com / mini-mill reviews — long-running reference on the Sieg X2 pattern and its variants, useful for context on what the HiTorque design improved.
- General references on R8 tooling, tramming, gib adjustment, and speeds-and-feeds are widely available; the LMS user’s guide and the community forums cover the machine-specific cases.
Together these cover the machine as bought, the readout as retrofitted, and the operating knowledge that turns the two into accurate parts. The build-specific details this shop still owes — the exact scales, their lengths, the tablet and its mount, and photographs of the installation — belong in the slots marked through these volumes and will complete the record when they are gathered.
Comments (0)